背景介绍
YOLO-V3(You Only Look Once):于2018年发表上。You Only Look Once体现了较高的检测速度,是一步法的典型代表,也是YOLO系列的第三个版本。
YOLO-V3和SSD的区别
特征提取网络不同,SSD的特征提取网络为VGG,YOLO-V3中的特征提取网络是ResNet的改进版本Darknet-53,实现深层次的特征融合。
先验框不同,SSD是根据每一层的尺寸和长宽比计算出来的,YOLO-V3中每一层的先验框是根据大量数据聚类而得的。
编解码函数不同,SSD的预测的是中心和宽高的相对偏移量,YOLO-V3预测的是中心的绝对偏移量,宽高的相对偏移量
损失函数不同,SSD采用Smooth-L1-Loss损失函数和多分类交叉熵损失函数。YOLO-V3采用MSE和二分类交叉熵损失函数
预测结果不同,SSD是在多个类别上求Softmax,选择最高的一个类别作为预测类别,YOLO-V3是通过Sigmoid函数,用置信度和预测结果相乘,超过阈值即可认为有目标存在,因此可以预测多个物体存在于一个预测框的情况。
正负样本数量不同,SSD正样本的数量是根据真实框的先验框的IOU确定的,只要大于设定值就视为正样本,然后设置正负样本的比例为1:3确定负样本的个数,YOLO-V3选择与真实框最接近的一个先验框作为正样本,然后从剩余样本中选择IOU小于设定值的作为负样本
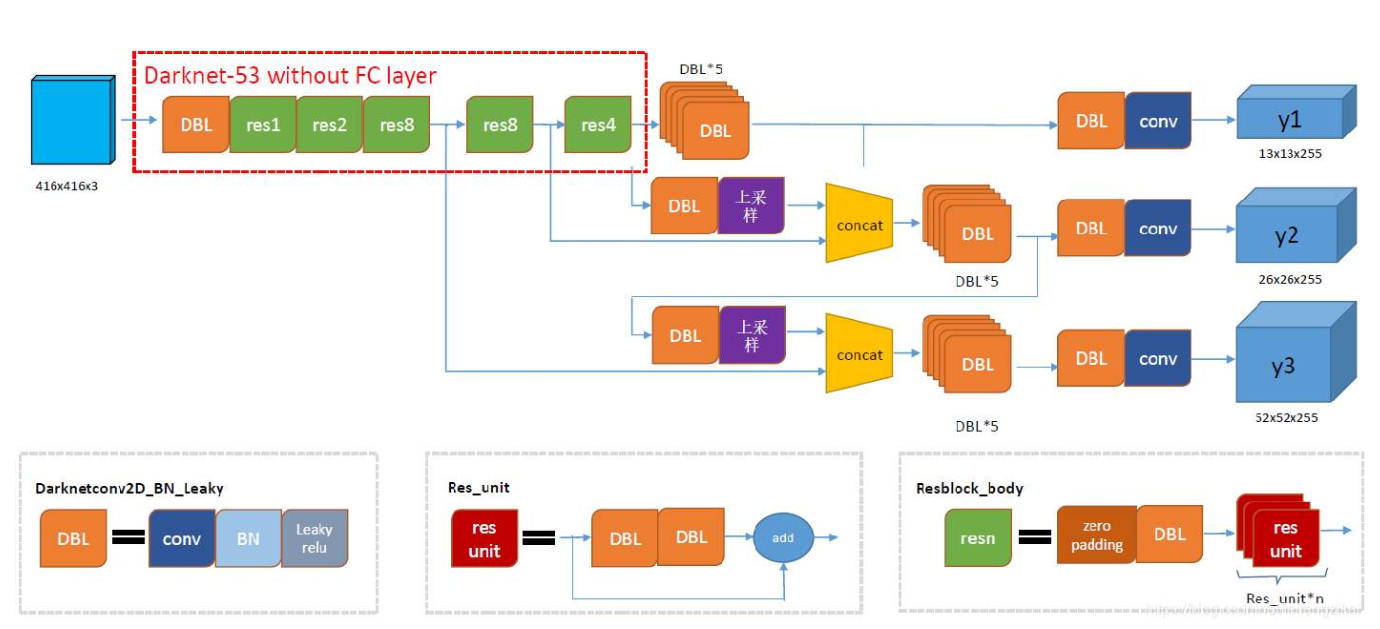
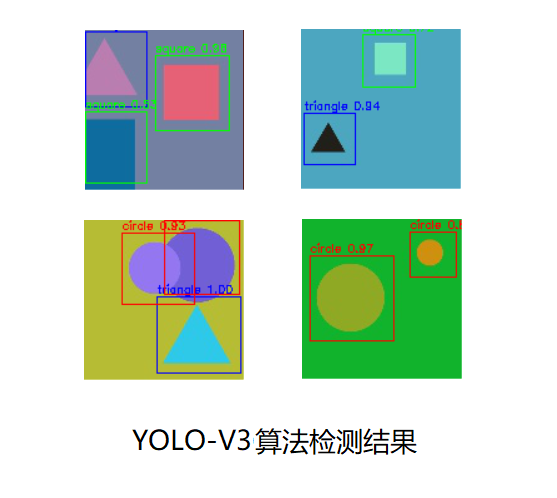
YOLO-V3图像分析

TensorFlow2.0实现
1 | from functools import reduce |

Shape数据集完整实战
文件路径关系说明
- project
- shape
- train_imgs(训练集图像文件夹)
- annotations(训练集标签文件夹)
- test_imgs(测试集图像文件夹)
- YOLO-V3_weight(模型权重文件夹)
- YOLO-V3_test_result(测试集结果文件夹)
- YOLO-V3.py
- shape
实战步骤说明
- 目标检测和语义分割是两种不同类型的工程项目,目标检测实战处理比语义分割困难的多,首先要读取真实框信息,将其保存下来,为了后面编码使用。
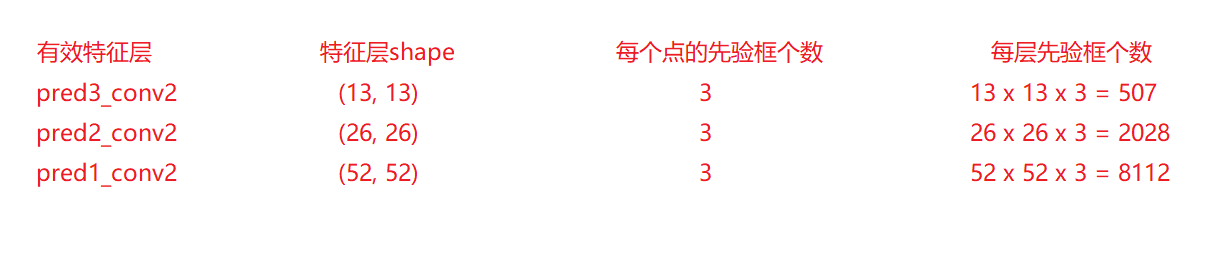
- 建立先验框,根据网络结构,在不同特征层上建立不同的先验框,先验框的总个数为每个回归分类特征层的像素点个数x每个像素点上的先验框个数。以论文中的先验框为例,特征层有3个,大小分别为52x52,26x26,13x13,特征层上每个像素点的先验框个数都是3个。
$$ 52^2 \times 3+26^2 \times 3+13^2 \times 3=10647 $$
故先验框总数为10647个。 - 根据真实框的信息,和所有先验框计算IOU,将IOU最大的先验框作为正样本。然后进行编码,在置信度上面置1说明该位置有目标,对应目标类别置信度置1,其他目标类别置信度置0,并计算正样本先验框的中心坐标与宽高和真实框的中心坐标与宽高之间的差异。输出(batch_size, num_prior, 4 + 1 + num_class + 1),num_prior为先验框的个数,每个先验框有4 + 1 + num_class + 1个值,4代表中心坐标和宽高相对真实框的差异,1代表属于有目标的置信度,num_class代表属于某一个类别的置信度,最后一个1代表真实框与先验框的IOU,方便计算损失时得到负样本。编码的目的是得到真实框对应的神经网络的输出应该是什么样子,然后让两者尽可能的接近。
IOU(Intersection Over Union,交并比):用于评估语义分割算法性能的指标是平均IOU,交并比也非常好理解,算法的结果与真实物体进行交运算的结果除以进行并运算的结果。通过下图可以直观的看出IOU的计算方法。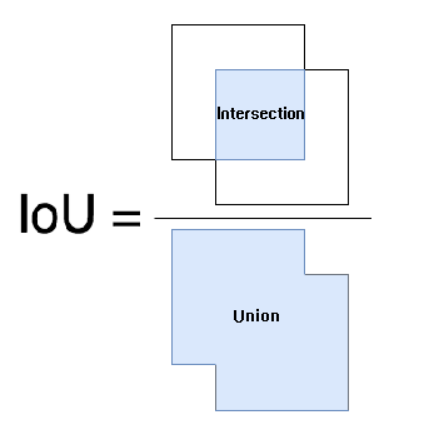
4. 设计损失函数,因为先验框中大部分都是负样本,因此不能直接计算损失函数,选择与真实框最接近的一个先验框作为正样本,然后从剩余样本中选择IOU小于设定值的作为负样本。
5. 搭建神经网络,设置合适参数,进行训练。
6. 预测时,需要根据神经网络的输出进行逆向解码(编码的反过程),根据置信度,选择背景置信度乘类别置信度大于设定值的先验框作为候选框,然后根据先验框的坐标和4个回归参数确定候选框的左上角和右下角坐标。对每一类候选框进行NMS得到预测框,并且在图像上画出预测框,并且标出置信度即可完成目标检测任务。
NMS(Non-Maximum Suppression,非极大值抑制):简单地说,不是最大的我不要,在目标检测中,往往图像上存在大量先验框,会导致很多附近的框都会预测出同一个物体,但是我们只保留最大的一个预测结果,这就是非极大值抑制。
步骤:
(1)从最大概率矩形框F开始,分别判断A~E与F的IOU是否大于某个设定的阈值,假设B、D与F的重叠度超过阈值,那么就扔掉B、D;并标记第一个矩形框F,是我们保留下来的。
(2)从剩下的矩形框A、C、E中,选择概率最大的E,然后判断E与A、C的重叠度,重叠度大于一定的阈值,那么就扔掉;并标记E是我们保留下来的第二个矩形框。
(3)重复步骤(2),直到所有的框都被抛弃或者保留。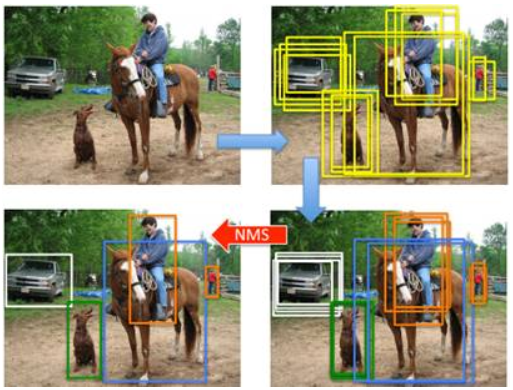
小技巧
- 神经网络的输出维度为(batch_size, num_prior, 4 + 1 + num_class),此数据集为3类,因此最后一个维度是8。每个先验框有8个索引,前面4个索引代表先验框的回归参数,用来对先验框进行调整得到预测框,索引为4代表有目标的置信度,索引为5代表圆形,索引为6代表三角形,索引为7代表正方形。
- 实际的工程应用中,常常还需要对数据集进行大小调整和增强,在这里为了简单起见,没有进行复杂的操作,小伙伴们应用中要记得根据自己的需要,对图像进行resize或者padding,然后旋转,对比度增强,仿射运算等等操作,增加模型的鲁棒性,并且实际中的图像不一定按照顺序命名的,因此应用中也要注意图像读取的文件名。
- 设置了权重的保存方式,学习率的下降方式和早停方式。
- 使用yield关键字,产生可迭代对象,不用将所有的数据都保存下来,大大节约内存。
- 其中将1000个数据,分成800个训练集,100个验证集和100个测试集,小伙伴们可以自行修改。
- 注意其中的一些维度变换和numpy,tensorflow常用操作,否则在阅读代码时可能会产生一些困难。
- YOLO-V3的特征提取网络为Darknet-53,小伙伴们可以参考特征提取网络部分内容,选择其他的网络进行特征提取,比较不同网络参数量,运行速度,最终结果之间的差异。
- 图像输入可以先将其归一化到0-1之间或者-1-1之间,因为网络的参数一般都比较小,所以归一化后计算方便,收敛较快。
- 根据实际的图像大小,选择合适的特征层数,先验框的形状,先验框数量,以及各种阈值
- anchor尺寸的确定,anchor通过聚类方法确定,anchor的大小对于检测效果有很大的影响,小伙伴们可以尝试不同的anchor,看一看测试的结果。
- TF2.0是一个不太稳定的版本,在训练时,常常出现卡顿情况,在损失函数中前面加上一句打印损失函数的值,就不会发生卡顿。。。喵喵喵~~~。
- 因为这个博客是对学习的一些总结和记录,意在和学习者探讨和交流,并且给准备入门的同学一些手把手的教学,因此关于目标检测的算法参数设计,我都是自己尝试的,不是针对于这个数据集最优的参数,大家可以根据自己的实际需要修改网络结构。
完整实战代码
1 | import colorsys |
模型运行结果
YOLO-V3小结
YOLO-V3是一种简单的目标检测网络,从上图可以看出YOLO-V3模型的参数量有62M,由于其结构简单,效果稳定,因此很多场合仍然使用YOLO-V3作为目标检测算法。YOLO-V3作为一步法目标检测的元老级模型,是小伙伴们需要掌握的一个模型。